Typhoon Frank and its Aftermath, An Appeal to All

>> Monday, June 30, 2008

The relief drive has begun, I feel very grateful that the people whom we have approached have given so generously of what they have to give. Nothing is too little and every little bit we can spare is a blessing. I would like to make an appeal to my fellow Ilonggos who are based in Manila or elsewhere in the world to help our cause. This appeal is of course not only to the Ilonggo but to anyone who wants to help.

What started out as a relief drive planned by my best friend Viv and I, has now become bigger than ourselves. It started out with just plans to send out whatever we could give ourselves. Then evolved into asking friends and family. The enormous response is very heartwarming. From donations of used clothing and shoes to donations of sacks of rice and even cash.

Just this morning as I was riding home from the gym, the news on the radio told of the complaints of the people from the Island of Panay decrying the lack of support and relief being given. According to the news sources, the delay was because there was no means of transport to the affected areas. I feel that we have to do what we can to make that help be available to the people in the affected towns.

According to my bestfriends family in Iloilo, there is still no electricity, they have been calling Panay Electric and were told it would take at least a month to get the electricity up again. It will take years to rehabilitate the towns that have been destructed. The damage is extensive. Please check out this site for a Photo Story: The Rampage of Typhoon Frank. This photo story will unfold the day to day event covered by Iloilo photojournalist Leo Solinap from day one to its aftermath.

I have also attached some videos from YouTube:


To everyone reading this, we would like to make an appeal for donations of old clothing( there is much need for childrens clothing, especially school age children), shoes, blankets, food, medicines. We are conducting the drive in Manila, please email me at relief4iloilo@yahoo.com for drop off points for donations. There will be 2 drop off points, one in Makati and one in Paranaque. My best friends family, among those who have been very lucky to have been spared, are helping us out with the logistics in Iloilo. They will also be conducting garage sales and every portion of the sale will go towards purchasing rice, food, drinking water, medicines. If you want to make a donation, please click on the paypal link on the left side of the blog.

If anyone would like to help out with the shipping of the items, please do get in touch with me. We are trying to find a way to get the goods to Iloilo at the least cost.

Thank you to everyone who has been instrumental in this, we are very grateful and I just can't say my thanks enough.

May God bless you.

Read more...

I'm Back and a Freebie

>> Saturday, June 28, 2008

Hi everyone, been so neglectful of this blog lately. The last time I was here was before I left the Philippines. Now, I am back….I guess you can say, I’m still working things out and sorting our life plans. Anyway.....

My Photoshop program has been down and so I was unable to scrap or do anything for the longest time. Even my kids know how bummed I was by that. Had everything reinstalled in my Mac just yesterday, and all bugs are fixed. YAY!!! Now, I’m up and running again. I was up till late last night getting myself reacquainted again with CS3 and going through tutorials (I love how you can find out how to do anything in the internet! I think I said that already in my other blog, but well it is true and I’m sure you will agree with me).

Last night I learned how to use patterns, thanks to Obsidian Dawn who is so very generous of her knowledge. I love her tutorials, so easy to understand and follow. She has got some great freebie brushes and patterns as well. Click on How to Use Photoshop Pattern Tutorials to get there.

I started making some papers to use for scrapping. I am trying to make a mini-kit to give away for a Donation Drive my best friend and I have set up for the victims of the recent typhoon that hit the Philippines, the province of Iloilo in particular which is my best friends hometown and my mother’s as well. You can read all about it in my other blog Beyond The Four Walls .

Here is a preview of the papers I made last night, not all of them will go in the kit since I will need to get permission first for use of brushes and patterns but you may download them here for a limited time before I finalize the rest of the kit ( for your personal use only), you may also go to Beyond The Four Walls if you wish to make a donation, the proceeds from this will go to help the people of Iloilo who have been badly hit by Typhoon Frank.


Click here to download: Relief

Read more...

Thumbs Up!

Here is an easy to prepare meal my kids love: Roasted Herb Chicken and Mashed Potatoes. It was one of those days when thinking of what to prepare for lunch was so hard to do because all we had inside the freezer was “Chicken!” hahaha! Fried chicken? Nope, not again. Chicken curry? We just had that. Tinola (Chicken Soup with Ginger and Chili leaves) hmmm too hot to have soup….DH said why don’t you make your roast chicken we haven’t had that for awhile (ting! lightbulb moment!), great idea plus we have lots of potatoes because it was “Buy one Take one” at Shopwise (LOL) so I’m making mashed potatoes to go with it.

Roasted Herb Chicken

1 whole Chicken
½ cup olive oil
1 tbsp salt or to taste
2 tbsp Italian seasoning
1 tbsp thyme
1 tsp marjoram
2 tbsp rosemary
1 tsp cracked pepper

Mix the olive oil, Italian seasoning, thyme, marjoram, rosemary and black pepper. Rub the chicken (inside and out) with salt. Pour the olive oil mixture onto the chicken and rub the mixture all over including the cavity. Make sure you massage the oil and herbs well and it is distributed evenly all over. If you have sprigs of rosemary, place them inside the cavity.

Roast in oven at 300 degrees until crisp. If you have a turbo broiler this will even taste better!

Mashed Potatoes

8 medium potatoes
1 ½ tsp salt or to taste
½ tsp pepper
2 tbsp butter
¼ cup milk
Mash the potatoes, add the butter, salt and pepper, mix. Add the milk, mix.

Teo was so hungry and excited to eat the potatoes wanting to taste every time I mixed something new in. When it was all done, he told me, “Mom, before you put the other ingredients the taste was just okay (giving me the thumb sign but with the thumb facing horizontally), after you put in all the other ingredients the taste is yummy! (giving me the thumbs up sign)” I asked him to recite back to me the ingredients we put in. Next time, I’ll have him make the mashed potatoes himself.

Read more...

Let Us Share Our Blessings

The classroom is now shaping up (my guest room that is!), the bed has been removed and given away, and my two extra large computer desks have come in very handy.


How I would love to have lots and lots of bookshelves…a lot of my books are now in boxes, such a shame. My one complain about the home we live in is that there is not enough storage space, well it is either that or I just have a lot of stuff (and to think I already gave so many of my things away already). Well I’m clearing my closets once more this weekend to look for things to donate, sometimes we are so burdened by all the material items we want to accumulate that it takes a tragic story to realize how much we still have and that we don’t really need very much.

A very bad thing has happened to my moms home town, Iloilo, so many towns were ravaged by the most recent Typhoon and a lot of the cities went underground, so many people whose lives were lost and whose property is gone forever. It has saddened me so much. My best friend, who is from there told me a lot of our friends were also affected, losing everything in their homes and that there are so many people now begging in the streets because they have lost everything.

My best friend and I have decided to have a donation drive – old clothes, blankets, shoes, anything that would be of help, please email at relief4iloilo@yahoo.com if you have anything to donate and I will email back the drop off address for the items or a Paypal link if you are donating any cash. We are going to accumulate everything we get and send them off to Iloilo. I am also preparing a small scrapbook kit to put up on sale for their benefit, proceeds from the sale of the kit shall be donated to a charity in the province. Do keep coming back to my blog to see if the Kit is up. Any help will be welcome, our collective efforts will make those small donations into something that will help some other persons life. I shall also be posting updates on how the drive is coming along and where the donations have gone. I thank you in advance for sharing your blessings.

On the lighter side, the children are adjusting to homeschool, they are very adjustable kids and can go with the flow. I am very thankful that they aren’t big whiners or rotten spoiled brats. They are both very sweet and lovable. We are very big on hugs and kisses at home, that is something I hope my children never outgrow. There is nothing like a great big hug to let one know how much you appreciate and love them. I am so blessed to have them.

Read more...

A Challenge

>> Friday, June 20, 2008

This is our first week of homeschool, I can tell you, it is challenging as well as fulfilling. I have been trying not to get myself so overwhelmed by every bit of information I come across. It is so hard not to want the best of everything for your children and yet work with a limited budget. That too is part of the challenge. I thank God though that there are so many helpful and wonderful people who have taken the time to reach out to the homeschool community. So many helpful blogs and sites, e-groups and communities.

The previous week was spent looking for a curriculum to follow and I was able to stumble upon some pre-owned copies of Alpha Omega Publications Lifepac Gold 500 series which were in very good condition. I decided to use this for my 4th Grader and supplement the materials with books his brother used in traditional school and materials garnered from the net. My 6th grader has the Lifepac Gold 600 series for Science. Right now, I am kind of at a loss as to which curricula to use, so I am trying out a few things and still researching. At the moment the basis for my lesson planning is the World Book Curriculum Standards for 6th Grade. I have been using countless resources from the internet, my bookmark page has gotten so full. It's amazing what you can find but there are instances it becomes frustrating because you can't find the exact thing you are looking for sometimes.

It was quite difficult going about the lessons without any concrete schedule and lesson plan to follow. So I set about looking for some forms to use, I came across Donna Young.org, she has got such a complete set of forms to use, there were quite a lot and in all honesty I haven't really used all the forms, I decided I needed badly right now a weekly planner - you can check it out here: Weekly Lesson Plan Forms.

Now that I have the forms, the tricky part is filling it up. I never realized how much work it is to be a teacher, determining your lessons for the day. I had to ask myself "What exercises do I use? Will I need manipulatives? Will I need to do experiments? What about books to read or web sites to visit?"...all that needs to be thought out properly and integrated into the weekly lessons. I thought that since my 4th grader had the complete set of Lifepac modules, all I needed was to portion out the pages for him to study per day. Whoa! Was I in for a surprise, first I realized that I may be giving him too many or too little pages to study - what may seem simple to me, may not be so simple to my child. They may take their time because of the questions they ask, they may want to look it up in reference books, or look it up in the internet. And you have to make sure that they do understand before you leave the topic.

Nevertheless, I have forged on, armed with what I have. Each day has become a learning day, not only for my kids but also for me. There are days when I stay awake late into the night browsing the web, reading and looking for material for the next days lessons. It is work to do this and yet, these past few days I have realized that I am also enjoying this and enjoying the time I spend with the kids.

Read more...

A Taste for Curry

>> Sunday, June 15, 2008

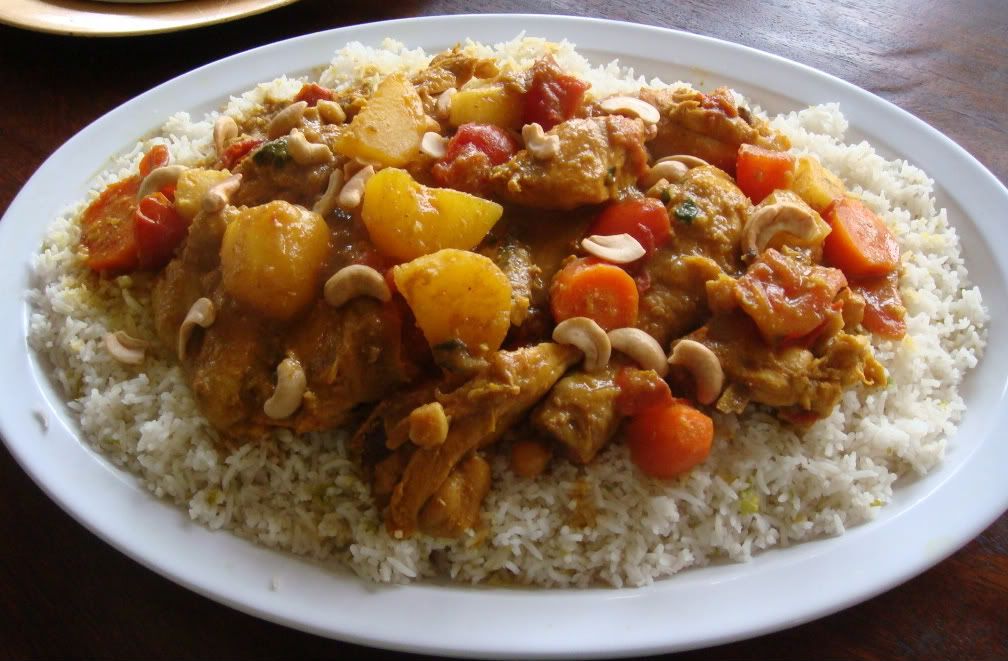
Here is a chicken curry recipe I tried that came out really delicious! My kids enjoyed the experience, they did not even notice that I gave them Basmati rice with the curry (haha).


Chicken Curry with Coconut

Serves 6-8
Preparation: 15-20 min
Cooking: 45-55 min

2 tablespoons chile oil (I substituted with regular palm or canola oil since my kids won't eat it spicy)
1 medium onion, finely chopped
1/2 red bell pepper (capsicum), seeded and finely sliced
2 teaspoons of curry paste (since I did not know where to find the curry paste, I used 2 teaspoons of curry powder)
4 cloves garlic, finely chopped
1 teaspoon minced ginger
1 teaspoon sweet paprika
1/2 teaspoon ground turmeric
1/2 cup (50g) cashew nuts
1 (200g) can pineapple cubes, drained, juice reserved (the first time I made this I did not have a can pineapple ready so I substituted the pineapple with sliced ripe mangoes, and the juice was just sugared water)
6 curry leaves (I could not find this and so did not put this in, it did not change the deliciousness of the dish)
2 bay leaves
1 tablespoon soy sauce
1 teaspoon dark brown sugar
3 1/2 cups coconut milk (fresh is always better than the powdered variety)
8 boneless chicken breasts cut into quarters or 1 whole chicken cut into pieces
5 medium sized tomatoes or 10 cherry tomatoes
Juice of 1/2 lime
Generous handful of finely chopped cilantro (coriander)
Salt
Freshly cooked basmati rice to serve

Heat wok or large frying pan over low heat and add the chile (or palm/canola) oil.
Add the onion, bell pepper, curry, ginger, garlic, paprika, turmeric and cashews. Stir-fry until aromatic, 2 minutes.
Remove from heat and stir in 2 tablespoons of the reserved pineapple juice
Return to low heat and add the curry leaves, bay leaves, soy sauce and brown sugar.
Pour in the coconut milk. Bring to a boil.
Simmer for 15 minutes, or until the sauce has been reduced by 1/3.
Remove from the heat and remove the bay and curry leaves.
Blend with a blender until smooth. Return to pan.
Add the chicken and tomatoes (you may add a small can of garbanzo beans, drain the liquid, the beans went well with the recipe)
Return to heat and simmer until the chicken is cooked.
Remove the chicken and place on serving dish covered with a bed of freshly cooked basmati rice.
Add the lime juice, cilantro, pineapple to the sauce and stir over high heat for 2 minutes. Season with salt to taste.
Spoon over the chicken and rice. Serve hot.


What I loved about this recipe was that the texture of the sauce was very different from the usual Filipino style chicken curry I learned to cook. It had all these flavors in it but you could not see what was in the sauce because everything got blended. The aroma was so pungent you could almost believe you were in an Indian or Middle Eastern restaurant. You can even substitute the chicken for prawns if you want, it really is the sauce the makes this recipe so impressive.

Go ahead, try it, I'm so sure your family will love it...mine did!

Read more...

Something Thai

>> Tuesday, June 10, 2008


About 2 weeks ago we had our first International Saturday lunch - the order of the day was Thai food. There was no rhyme or reason for choosing Thai food over another, it just so happened that as I was grocering at Shopwise, I came across some Thai Sauces and Dips and the uncooked rice noodles and purchased some to stock in my mini-pantry.

Since I had no idea whatsoever on how to cook Thai food, I had to turn to my best source of information - the internet. You can find just about any recipe over the net, be it at Food Network, Recipezaar, AllRecipes or About.com. Or just type into Google the kind of recipe you are looking for and get a multitude of answers.

Sometimes you will find so many variations of the same recipe that it will get confusing - "What should I choose?" What I normally do is choose the recipe that has the most number of reviews - take in mind though that a recipe may have 4 stars but only one person reviewed it, so I normally scroll down and choose the one with the most number of people who have tried the recipe and have given it good reviews. More often than not, I tend to look at 2 or 3 of the recipes I have narrowed down and check the ingredient list. If I can't find the ingredient in our local grocer or at the wet market, then I try to check the other recipes if there is something I can substitute. You just really have to be open experimenting with what you have available.

Because I did not have any particular Thai food in mind, I just typed in "Thai Food" and ended up with some Thai recipes from About.com and settled on Pad Thai, Pineapple Rice, Spring Rolls and Tom Yum soup. What I like about the About.com site is they have a lot of pictures and show you everything step by step, they even had a video on how to make the pineapple boat for the rice.

Like anything you do for the first time, make sure to give yourself ample time for preparation. Prepare all ingredients before hand, making sure everything is chopped, sliced, diced, crushed or whatever is in the recipe. All ingredients have to be measured before hand so you are not at a loss and trying to grab onto the copy of the recipe each and every time. Take it from me, I'm guilty of that, it will make your life so much easier. I never did get a chance to make the Tom Yum soup because I got so overwhelmed with all that preparation, that I ended up serving lunch at 1 p.m.!

Here are the recipes (you can click on the type of recipe if you want to go straight to the site and see their step by step picture guide):

Phuket Pad Thai


Place 10-14 oz.(or 1 package) Thai rice noodles in a pot of cool water (the noodles should be roughly the thickness of linguini). 10 oz. of dry noodles makes enough for 2 people. Allow noodles to soak for 1 hour, then drain.
If You're in a Hurry: Bring the water to a near-boil, then remove from heat. Soak noodles in this water for 10-20 minutes while you prepare the other ingredients. The noodles should soften but not "cook". When they are tender enough to eat (but still firm and a little "crunchy"), drain and run through with cold water. Then pour 1 tsp. of canola oil onto noodles and mix through with your hands (this will keep them from sticking together). [Cooking Mama Notes: For those of us looking for the Thai rice noodles, you don't need to go too far, Shopwise carries the noodle in its noodle section, just make sure to choose the thinner noodle since I made the mistake of getting the thicker one.]

Note: Be careful not to over-soften them, or they'll become soggy once they're stir-fried.

For this recipe, you will also need:
3 Tbsp. each of: fish sauce [our local patis], rice vinegar (or white vinegar), and soy sauce
3 cloves garlic, minced
1-2 red chillies (2 makes this dish very spicy), minced
1 tsp. brown sugar
1/4 cup chicken broth
8-12 medium or large fresh raw prawns
optional: 1/2 to 1 cup cooked chicken, and/or 1 cup tofu, cut into cubes
1 egg
approximately 2 cups bean sprouts
1/2 cup each of fresh coriander [this is called Wan-soy locally] and fresh basil
1 lime, cut into wedges
canola oil, or other good-quality oil for stir-frying
optional: 1/4 cup roasted peanuts, ground or roughly chopped
optional: shrimp-flavored crushed chilli

Soften the Noodles.
Mix the Stir-Fry Sauce in a Cup.
Stir-Fry Garlic and Chillies.
Add the Prawns (plus chicken and tofu) and Stir-Fry
Add the Egg.
Add the noodles.
Add the Stir-Fry Sauce.
Stir-fry the Noodles.
Add the Beansprouts.

Plate the Pad Thai, Add Toppings, and Enjoy!

Pineapple Fried Rice


INGREDIENTS

1 cup pineapple tidbits (fresh is better, but canned will work too)
3 cups cooked rice, preferably several days old
4 Tbsp oil for frying - peanut or other nut oils work well [I did not have peanut oil so made do with half canola oil and half sesame oil]
1-3 Tbsp. chicken or vegetable stock
2 shallots, thinly sliced
3 cloves garlic, minced
1 red or green chili (de-seeded if milder rice is desired)
1/2 cup roasted unsalted cashews
1/2 cup frozen peas
1 egg, beaten (omit if vegan)
1/4 cup currants (or raisins)
2 Tbsp. fish sauce or vegetarian fish sauce (available at Vietnamese stores)
2 tsp. curry powder
3 spring onions, finely sliced
1/3 cup fresh coriander [Wan-soy]
Optional: 8-12 fresh prawns

Start by preparing the rice. Add a little oil to the rice (up to 1 Tbsp.) and work through with your fingers. You want to separate the grains of rice, so that they don't stick together. Set aside.

Prepare the Rice
Stir fry the Shallots, Garlic, and Chilli
Add the Egg.
Add Spice and Sauces
Add the Cashews
Add the Rice
Add the Peas, Currents (or Raisins), and Pineapple.
Continue Stir frying and do a Taste Test
Serve

Thai Spring Rolls


This Thai spring roll recipe can be made vegetarian with tofu, or with baby shrimp if you prefer. Brimming with vegetables and lots of flavor, these spring rolls make a great appetizer or party food. And they're surprisingly easy to make. Get some help from your children or guests with the rolling, and you'll be enjoying these spring rolls in no time.

INGREDIENTS:
3 cloves garlic, minced
1 thumb-size piece galangal (or ginger), grated
2 shallots, thinly sliced
1 red chilli, de-seeded and finely sliced (omit altogether if you prefer very mild springrolls)
1/2 cup shredded or finely chopped cabbage
4-6 shiitake mushrooms, sliced thinly
1/2 cup tofu, cut into matchstick-like pieces (Optional if non-vegetarian: add 1/2 cup baby shrimp instead)
approx. 2 cups bean sprouts
1/2 cup fresh coriander [Wan-soy], roughly chopped
1/2 cup fresh basil, roughly chopped
2 Tbsp. oil for stir-frying, plus more for deep-frying
1 pkg. small spring roll wrappers
STIR-FRYING SAUCE:
2 Tbsp. regular soy sauce
2 Tbsp. fish sauce (if vegetarian, use vegetarian oyster sauce)
2 Tbsp. lime juice
1/4 tsp. sugar

TO SERVE:
Thai sweet chilli sauce (available in Asian/Chinese food stores, and some grocery chains in the Asian section)
OR TO MAKE YOUR OWN DIPPING SAUCE:
Mix 1/3 cup plum sauce with 2 Tbsp. soy sauce and 1 Tbsp. fish sauce (or vegetarian fish sauce). Add chilli if desired.

PREPARATION:
Place 2 Tbsp. oil in a wok or large frying pan over medium to high heat. Add garlic, galangal (or ginger), shallots, and chilli. Stir-fry until fragrant (about 1 minute). Stir-frying Tip: Add a little water to the wok/pan when it gets too dry instead of more oil.

Add cabbage, mushrooms, and tofu (or shrimp).
As you stir-fry, add the sauce. Stir-fry 1-2 minutes, until vegetables have softened.
Add bean sprouts, tossing to mix in. Remove from heat.
Do a taste test for salt, adding 1 Tbsp. more fish sauce if not salty enough.

To assemble rolls, place a spring roll wrapper on a clean working surface. Add one heaping Tbsp. of the filling on the wrapper. Tips: Spread the filling lengthwise along the spring roll wrapper nearer the end closest to you. Also, try not to include too much of the liquid left in the bottom of your wok/pan - drier filling is better.

Sprinkle some of the fresh coriander and basil over the filling.

Fold the left and right sides of wrapper over filling, then lift up the end nearest you and tuck overtop. Roll to the other end. Secure the roll by dipping your fingers in some water and wetting the end, "pasting" it shut.

To fry spring rolls, place some oil (about 1 inch deep) in a wok or deep-sided frying pan over medium-high heat. When bubbles rise from the bottom of the pan, or when the oil begins to form snake-like lines across the bottom of the pan, the oil may be hot enough. To test it, dip one corner of a spring roll into the oil. If it beginsto sizzle and cook, the oil is ready. If not, wait another 30 seconds to one minute and try again.

Using tongs, place spring rolls in oil, allowing them to fry about 1 minute on each side. Spring rolls are done when they turn light to medium golden-brown. Place on paper towels (or a clean dish towel) to drain while you finish frying all the rolls.
Serve spring rolls while still hot with Thai sweet chili sauce, or your own dipping sauce (recipe above).


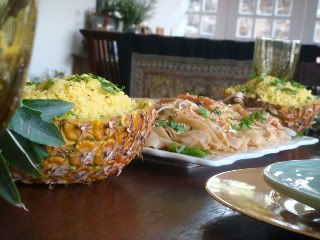
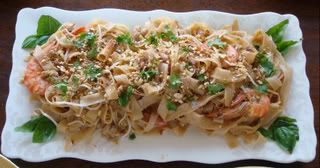
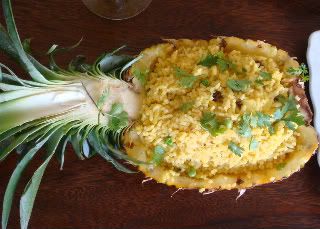
The Pineapple fried rice was a hit with the adults and my eldest son ( my youngest son as usual picked at it and eventually asked for white rice!), as was the spring roll (though I still thought it needed a bit more tweaking in the size department, I can't seem to make them nice and tiny like the one served in Thai restaurants). My pad thai needs a bit more work, I found the noodles too thick (the uncooked noodle was about the size of fetuccine noodles but when soaked expanded) and the sauce a bit too dry when following the recipe. I suggest making more stir fry sauce and just keep adding to taste or till the consistency is right.

This was all so much fun doing! I love trying to present the food nicely and so made do with whatever platters I had on hand adding little touches here and there (pictures as shown above). But you know what was the best thing? It was being around family and just enjoying the moment. Have a good day and happy eating!

Read more...
Related Posts with Thumbnails

Picture

Picture

About This Blog

All about me, my musings, ramblings, fancies, quirks and dreams; the blessings in my life - the kids and their growing years; and my love for digital scrapbooking/design and graphic arts; and my eternal quest to keep learning something new each day and give back in my little way.

This blog used to be 3 blogs which I decided to merge together, my scrapping blog (Pandoras Box of Thought), the blog about my kids (Beyond the Four Walls) and my cooking/recipe blog (Cooking Mama) - all the old posts are still up but I've decided to just post everything in the future in one forum, with all the things I'm doing, I'd like to keep everything in one neat container :)


  © Blogger template Simple n' Sweet by Ourblogtemplates.com 2009

Back to TOP